

Using a cross-platform framework like NativeScript, React Native, Flutter, or Ionic saves you a lot of headaches by avoiding native code like Java for Android and Objective-C for iOS. These frameworks abstract many native elements and provide a cleaner interface and functions for you to use.
However, there will still be times when the framework’s capabilities are not enough. Your app might require some very niche use cases that need to be handled at the native level for performance reasons or simply because the framework alone cannot achieve them.
In this article, we will explore how NativeScript enables you to easily extend any native Java class using the two methods below.
Method 1: The NativeScript way using TS/JS binding
One of the most unique features of NativeScript is native type marshalling, which means most native classes and types can be accessed directly from your TypeScript/JavaScript codebase. NativeScript automatically handles the conversion of data types between the JavaScript environment and the native environment.
This feature plays a crucial role in extending native classes without needing to handle complex native Java code.
You can find more information about marshalling and extending in Android on NativeScript doc, it contains pretty useful information about how native data is mapping between JS and Native.:
- https://docs.nativescript.org/guide/android-marshalling
- https://docs.nativescript.org/guide/extending-classes-and-implementing-interfaces-android
Show me how to do it
Via .extend() function
If you prefer a functional style, you can call the extend() method on any native class to create a subclass from it. In Java, classes are organized in directories known as package names. In NativeScript, a native Java class can be referenced by its full package name and class name.
Here is example extend code:
(<any>androidx.appcompat.app.AppCompatActivity).extend('com.newbiescripter.MainActivity', {
onCreate(savedInstanceState: android.os.Bundle): void {
this.super.onCreate(savedInstanceState)
},
onNewIntent(intent: android.content.Intent): void {
// ..
},
onSaveInstanceState(outState: android.os.Bundle): void {
// ..
},
onStart(): void {
// ..
},
onStop(): void {
// ..
},
// override any other method if needed
// ...
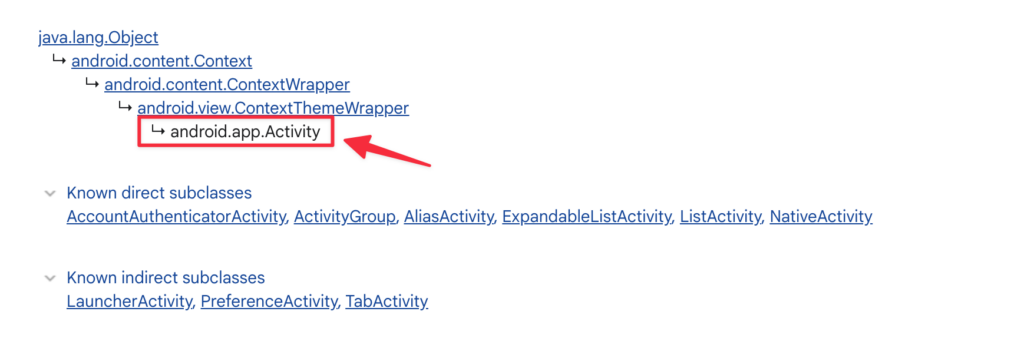
});If you unsure about package name, you can always check it out on Android develop reference. For example, here is the doc for Activity class, look at its class hieracy you will see the full package name.
Via @NativeClass & @JavaProxy decorator
If you prefer a cleaner, more natural class syntax, you might want to look at the decorators provided by NativeScript: @NativeClass and @JavaProxy.
Here is an example code that does exactly the same thing as the previous example:
@NativeClass
@JavaProxy('com.newbiescripter.MainActivity')
class MainActivity extends (<any>androidx.appcompat.app.AppCompatActivity) {
    onCreate(savedInstanceState: android.os.Bundle): void {
        this.super.onCreate(savedInstanceState)
    }

    onNewIntent(intent: android.content.Intent): void {

    }

    onSaveInstanceState(outState: android.os.Bundle): void {

    }

    onStart(): void {

    }

    onStop(): void {

    }

    // override any other method if needed
    // ...
};
@JavaProxy gives you the opportunity to name your class in the Java world, in case you would like to reference it from other parts of your codebase. Although you can omit @JavaProxy completely and your class will become anonymous, I prefer to name my own class.
The result of both methods is the same; they differ only in writing style, so you can choose based on your preference. At the end of the day, the code will be compiled down to Java and stored in the `platforms/android` folder during build time.

An interesting point is that you wouldn’t see the implementation of your TypeScript/JavaScript code in the generated Java class. It actually just contains a small piece of Java code that handles incoming parameters, then sends them back to the JavaScript world, which will eventually call your JavaScript method. How cool is that!
What is the catch?
In case you’ve done something wrong, if you’re lucky, you’ll see the compiler throwing an error at build time. However, sometimes it remains silently unnoticed until an unexpected error occurs at runtime. Here are some common issues that often leave me scratching my head during debugging:
- Must be Android’s native classes: For example,
androidx.appcompat.app.AppCompatActivitywill work. Or classes from package you installed via app.gradle. Make sure the class is existed. - Avoid extending already extended classes: Trying to extend a class that has already been extended using the above method will not work. Trying to extend compile-time classes such as the Activity class generated by NativeScript: com.tns.NativeScriptActivity will not work.
- Must be included to be generated: The .ts/.js file contains the code that extend native class, must be included directly in webpack’s appComponents params or indirectly through a file that included in appComponents and then import that .ts/.js file. (Please mind that app.ts/js is included by default). If the file is not imported by any other .ts file, it is treated as unused, and not be generated at build time.
- Must execute
ns build androidonce: This is necessary for the native.javaclass file and its binding to be generated. Otherwise, no.javafile is generated, and aJava's ClassNotFoundExceptionwill be thrown during runtime. Caution:ns run androidalone doesn’t always trigger this action. - 90% of your problem is the native
.javaclass file not being generated: If you are unsure, navigate to theplatforms/android/app/src/main/javafolder and look for your custom class. In Java, classes are organized by their package name, socom.newbiescripter.CustomClasswould be located atapp/src/main/java/com/newbiescripter/CustomClass.java… this is also the reason, I recommend to give your class a name and avoid anonymous class, it would be easier to look up for it in platforms folder
Method 2: Native for Native, the native Java way
If you are a hard-core Java developer and prefer doing it at a lower level, this might be more straightforward for you. Technically, everything put inside your project’s App_Resources/Android/src will later be copied to platforms/android/app/src and be compiled into the final app bundle.
So, we can take advatange of this to actually writing Java code, and extend other class within it. Here is a quick sample Java code:
package com.newbiescripter;
import android.content.Context;
import android.widget.Button;
public class CustomButton extends Button {
public CustomButton(Context context) {
super(context);
}
@Override
public void setEnabled(boolean enabled) {
super.setEnabled(enabled);
}
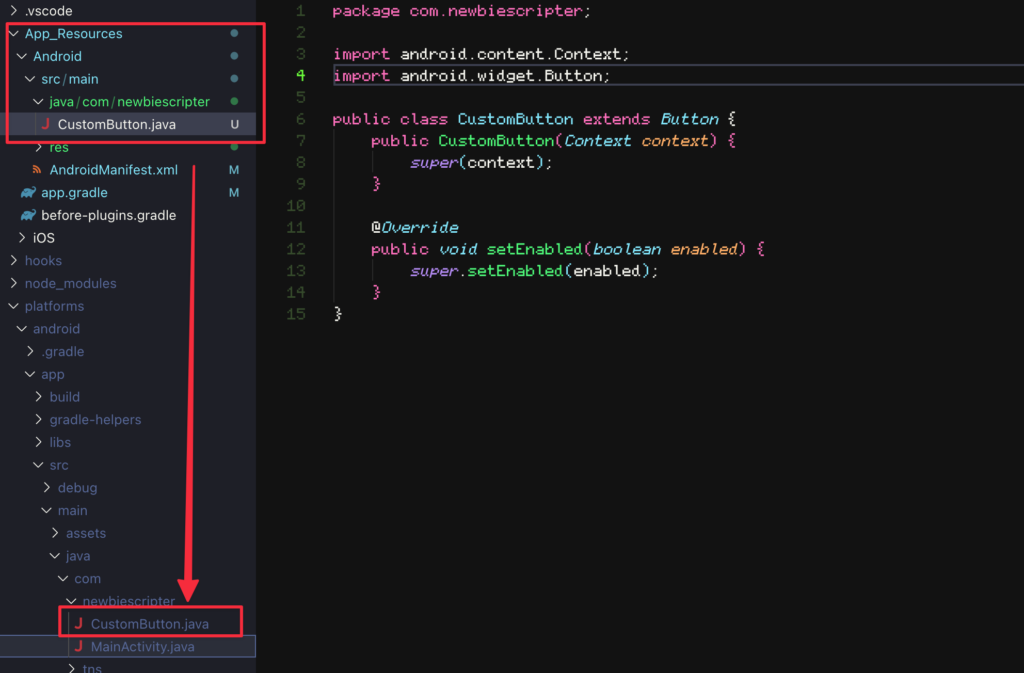
}We place this inside App_Resources/Android/src/main/java/com/newbiescripter/CustomButton.java (though it’s quite nested…). During build time, you will see it copied to the platforms/android folder like this:
Pros of this, is your class is 100% native and no marshalling things happening, which may result in better performance, if your code is computation intensive.
The end
In summary, it’s up to you to choose between the two methods above to find what is more suitable for you and your team. Personally, I prefer method 1, as it keeps me comfortable staying on the JavaScript side, which also exploits the true power of NativeScript.
I hope this article has taught you a few tricks. Please forgive the simplistic implementation and naming in the examples—they were meant for demonstration purposes. See you next time in the next article, where we will try to do something truly useful using these methods.