- Poolsuite FM Player in NativeScript, Part 1: Project setup + UI
- Android PoolSuite FM in NativeScript, Part 2: Refining the UI
- Android PoolSuite FM in NativeScript, Part 3: 🎵 Playing the music
Continue with our journey to craft PoolPartyFM – an Android Poolsuite FM Player in NativeScript. By the end of Part 2, we already have a nice retro look and feel for the app. We even created the waveform progress bar that is ready to be used.
In this Part 3, we will cover the final missing piece of the app: the music! To play music, we will need a way to get audio files or streams from PoolSuite FM’s playlist. After we have the audio file, we need to feed it into a native library to actually produce sound in our app. Also, we need to incorporate the audio sample rate into our waveform progress bar created in the previous part.
So today’s to-do list is:
- Fetch playlist and songs from PoolSuite FM’s API
- Feed the audio file to the native library to play the song
- Update the shapes and progress on the waveform progress bar
Before we begin, TLDR; you may find the full source code & any updates later will be available on Github: https://github.com/NewbieScripterRepo/PoolPartyFM
And the source code of Part 3 by the end of this article, is on part-3-api-with-exoplayer branch. Feel free to clone it and play around. Please star the repo if you don’t want to miss any updates. Let’s get started.
1. Fetch playlist & song for our Android PoolSuite FM app
1.1. Reverse engineering PoolSuite FM’s APIs
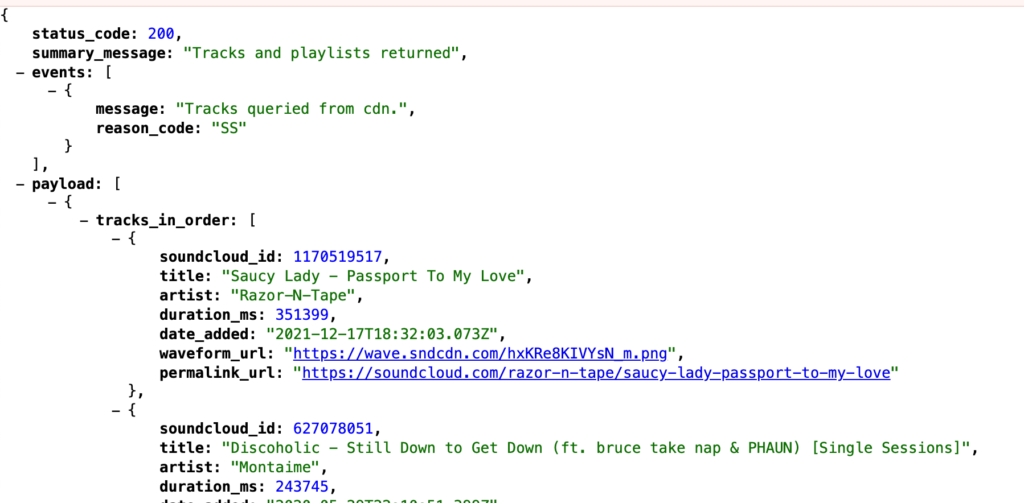
I simply looked at the web version of PoolSuite FM at https://poolsuite.net, hooked up the Chrome Inspector, and checked the network tabs. You will find two useful APIs located on the api.poolsidefm.workers.dev domain.
- /v1/get_tracks_by_playlist -> return all available playlists and its songs
- /v2/get_sc_mp3_stream -> to get a single track’s audio file, follow by
?track_idparameter

At a quick glance, their audio is hosted on SoundCloud. SoundCloud does provide an API to access their music stream; however, it is not open to public registration (at least at the time of writing this article, registration is closed). Therefore, the original PoolSuite FM author must have somehow obtained access to the SoundCloud API, then written a wrapper around the SoundCloud API and deployed it as a Cloudflare Worker.
Disclaimer: I don’t own any of the APIs mentioned above; they are all run by the original PoolSuite FM team. For the purposes of this educational project, I hope we don’t violate any of their rights. Thanks to their hard work, the APIs are already clear and straightforward to use.
1.2. Fetch API from NativeScript
In NativeScript, you can easily make an HTTP request using fetch just like in web development. Let’s create a variable to hold our playlist and its tracks. Later, when the app opens, we’ll fetch the API and implement state management to keep track of the currently selected playlist and songs.
// some variable to store current playing state
const playListData = ref<null | PlaylistResponse>(null);
const playState = ref<string>("paused");
const activePlaylist = ref<Playlist | null>(null);
const activeTrack = ref<Track | null>(null);
const activeIndex = ref(0);

const onLoaded = () => {
  if (!playListData.value) {
    fetchPlaylist();
  }
};

const fetchPlaylist = () => {
  playState.value = "loading";
  fetch("https://api.poolsidefm.workers.dev/v1/get_tracks_by_playlist")
    .then((response) => response.json())
    .then((data: PlaylistResponse) => {
      playListData.value = data;
      setPlaylist(playListData.value.payload[0]);
      playState.value = "paused";
    })
    .catch((error) => {
      console.error("Error fetching playlist", error);
      playState.value = "paused";
    });
};

const setPlaylist = (playlist: Playlist) => {
  activePlaylist.value = playlist;
  if (playlist.tracks_in_order[0]) {
    setActiveTrack(playlist.tracks_in_order[0]);
    activeIndex.value = 0;
  } else {
    setActiveTrack(null);
    activeIndex.value = 0;
  }
};

const setActiveTrack = (track: Track | null) => {
  activeTrack.value = track;
  console.log("Switch track: ", track?.title);
  if (track) {
    track.audio_url = `https://api.poolsidefm.workers.dev/v2/get_sc_mp3_stream?track_id=${trackId}`;
    loadAudio(track);
  }
};
The loadAudio(track) function will be where we handle actual native logic to play the audio file we just got from /v2/get_sc_mp3_stream
2. Feed audio file to native library, to play song
2.1. Audio library choice
In NativeScript, we have several options for playing audio. One option is to use the Player from the nativescript-audio plugin, which is a thin wrapper around android.media.MediaPlayer. While this should work, you will soon notice a delay of around 3 to 10 seconds (depending on your device) whenever we start playing any audio from a remote URL. There is no workaround for this issue, as it is a longstanding problem with the MediaPlayer class’s buffering for remote media that has never been resolved, and it’s doubtful that it will be in the future.
For your reference, I will leave the implementation using nativescript-audio on part-3-api branch. You can checkout I see for yourself.
So what should we do now? My choice would be go with ExoPlayer. It is sure heavier than built-in MediaPlayer as it also support Video, which we never use in the project. Kind of overkill though, however ExoPlayer doesn’t have the buffering problem mentioned above. For me, that is a must for smooth UX.
Thanks to Marshalling in Nativescript, we can easily make a thin wrapper around ExoPlayer API and play our music with it. And that’s what I do with my AudioPlayer class, which I wrote specified for this app.
P/s: Some may notice, there is an awesome plugin called nativescript-exoplayer also maintained by nstudio. And wonder why don’t we just use it instead of making our own AudioPlayer. The reason was we need the audio part only. Also, I don’t want to include any extra UI into our app, we already have a fine-grained retro UI in place. Spoiler alert: I copycat most of the code from nativescript-exoplayer plugin 😂
2.2. Play the song with AudioPlayer
Now that we have all the necessary tools at our disposal, we can effortlessly integrate the AudioPlayer into our app. Initially, we ensure that an instance of the AudioPlayer is created after the app has finished loading:
<script lang="ts">
let audioPlayer: AudioPlayer | null = null;

const onLoaded = () => {
  if (!audioPlayer) {
    audioPlayer = new AudioPlayer();
  }
  // ...
};
</script>

<template>
  ...
  <Page @loaded="onLoaded">
  ...
</template>
If you leave new AudioPlayer() outside, it may cause application to crash, as Android’s ApplicationContext is not fully initialized. loaded is your friend!
Next, we can easily play any remote audio file with openUrl() and play() method on AudioPlayer, like this:
audioPlayer.openUrl(track.audio_url);
audioPlayer.play();
In AudioPlayer class, I also included a getCurrentTime method, which under the hood, call the getCurrentPosition against the native ExoPlayer instance, and return the current time as miliseconds. Take advantage of this, and the duration_ms which was returned from the playlist API previously. We know exactly the progress of current track by doing simple calculation:
const progressTimer = ref<any>(null);
const progress = ref(0.0); // in percent
const progressInMs = ref(0); // in milliseconds
const progressText = ref("0:00 / 0:00");

onMounted(() => {
  // keep track of progress
  progressTimer.value = setInterval(() => {
    if (playState.value === "playing" && activeTrack.value) {
      const duration = activeTrack.value.duration_ms;
      const currentMs = audioPlayer.getCurrentTime();
      progressInMs.value = currentMs;
      progress.value = (currentMs / duration) * 100;
    }
    progressText.value = `${convertToHHmm(progressInMs.value)} / ${convertToHHmm(
      activeTrack.value?.duration_ms || 0
    )}`;
  }, 1000);
});
In the above code, you see I am using a setInterval timer which tick one per second to update the progress whenever playState is playing. To prevent unexpected behavior from the timer, it is best practice to destroy it when not used anymore:
onUnmounted(() => {
  if (progressTimer.value) {
    clearInterval(progressTimer.value);
  }
});
3. Hook up data to our Android PoolSuite FM’s UI – make it alive!
With all data available, we can now bind each piece of data into UI we made in the past, and make it come to live.
Track information:
...
<StackLayout row="1" col="1" colSpan="2" class="py-2">
  <Label
    color="#000"
    class="text-black font-pixelarial text-center"
    :text="progressText"
  />
  <Label
    class="text-black my-2 text-center font-chikarego2"
    :text="activeTrack?.title || 'No track selected'"
  />
  <Label
    class="text-black font-pixelarial text-center"
    :text="activeTrack?.artist || 'Unknown artist'"
  />
</StackLayout>
...
The channel switcher:
<Button
  ...
  @tap="onTapChannel"
>
  <FormattedString>
    <Span fontSize="8" text="Channel: " />
    <Span
      fontSize="16"
      class="font-chikarego2"
      :text="activePlaylist?.name"
    />
    <Span text=" " />
    <Span class="fas text-xs" :text="$fonticon('fa-sort')" />
  </FormattedString>
</Button>
To display list of available channels, simple Dialogs.action is enough I think, so:
const onTapChannel = () => {
  Dialogs.action({
    message: "Select a channel",
    cancelButtonText: "Cancel",
    actions: playListData.value?.payload.map((playlist) => playlist.name) || [],
  }).then((result) => {
    if (result !== "Cancel") {
      if (activePlaylist.value?.name === result) {
        return;
      }
      const selectedPlaylist = playListData.value?.payload.find(
        (playlist) => playlist.name === result
      );
      if (selectedPlaylist) {
        setPlaylist(selectedPlaylist);
      }
    }
  });
};
The backward, forward and play controls
Using the setActiveTrack method we created in previous part, we can easily implement logic for those 3 buttons by:
const onTapBackward = () => {
  // previous track
  if (activePlaylist.value) {
    pauseAudio();
    const tracks = activePlaylist.value.tracks_in_order;
    const currentIndex = activeIndex.value;
    const newIndex = currentIndex - 1;
    if (newIndex >= 0) {
      setActiveTrack(tracks[newIndex]);
      activeIndex.value = newIndex;
    }
  }
};

const onTapForward = () => {
  // next track
  if (activePlaylist.value) {
    pauseAudio();
    const tracks = activePlaylist.value.tracks_in_order;
    const currentIndex = activeIndex.value;
    const newIndex = currentIndex + 1;
    if (newIndex < tracks.length) {
      setActiveTrack(tracks[newIndex]);
      activeIndex.value = newIndex;
    }
  }
};

const onTapPlay = () => {
  // toggle play state
  if (playState.value === "paused" && activeTrack.value) {
    playState.value = "playing";
    AudioPlayer.play()
  } else {
    playState.value = "paused";
    AudioPlayer.pause()
  }
};
And don’t forget to attach the event:
<Button
  ...
  :text="$fonticon('fa-step-backward')"
  @tap="onTapBackward"
/>
<Button
  ...
  :text="
    playState === 'paused'
      ? $fonticon('fa-play')
      : $fonticon('fa-pause')
  "
  @tap="onTapPlay"
/>
<Button
  ...
  :text="$fonticon('fa-step-forward')"
  @tap="onTapForward"
/>
4. WaveForm progress bar updated!
4.1 Understand the data
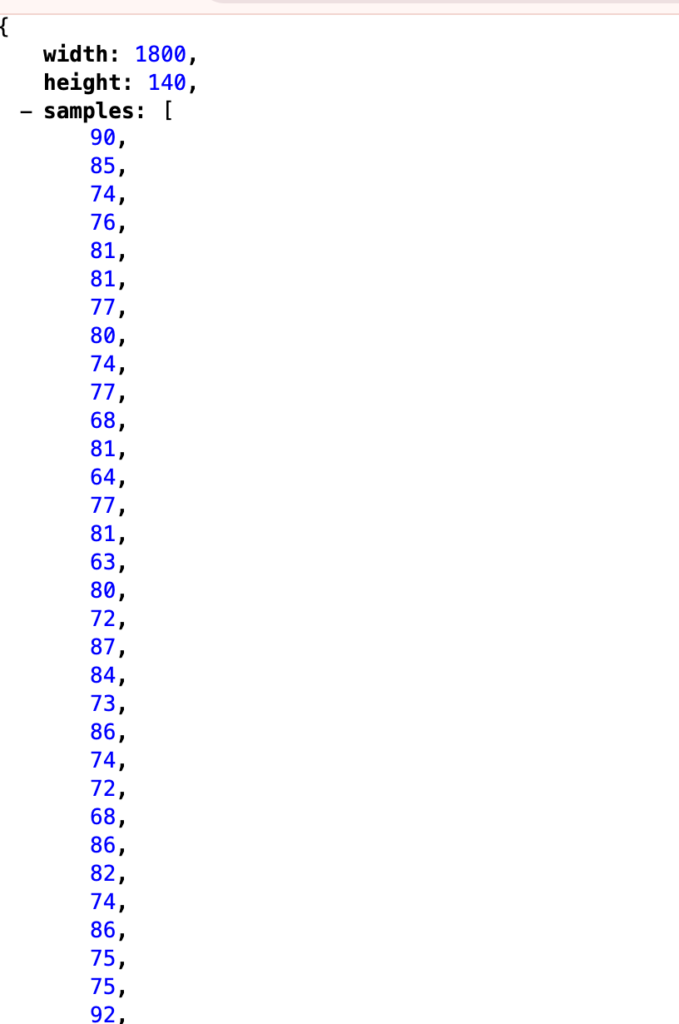
In the API, you will notice there is a field called waveform_url, which is an url to png image that present waveform of this audio file which is not very useful for us to visualize this data in our app.

However, if you try swap the “.png” part in the url with “.json”. Viola! We got a nice data like this:

This is the wave form presented as JSON. Each data point in samples is a single bar in the “.png” picture we saw earlier. So, width=1800, mean there are 1800 data points in samples array. While height=140, mean, max height of each datapoint should be from 0 – 140. With this information, we are gonna translate it to our humble waveform progress UI which always have exactly 100 bars.
4.2. Feed it into our progress bar
First, let’s feed the waveform data into our progress bar.
<ProgressBar
  :progress="progress"
  row="1"
  colSpan="3"
  class="mt-3"
  :waveform="activeTrack?.waveform_data || []"
/>
Inside the ProgressBar component, let’s try translate the sample datapoint into our 100. So, our plan is simple, divide the samples array into 100 equal parts, and take medians value of each part, then translate that value from waveform’s height (which is 140 for above sample JSON) to our bar’s height (which is 100):
let bars = computed(() => {
  const data = [];
  if (!props.waveform.samples) {
    for (let i = 0; i < barsCount; i++) {
      data.push(minHeight);
    }
  } else {
    const { width, height, samples } = props.waveform;
    const step = Math.floor(width / barsCount);
    for (let i = 0; i < barsCount; i++) {
      const start = i * step;
      const end = (i + 1) * step;
      const average =
        samples.slice(start, end).reduce((sum, value) => sum + value, 0) / step;
      data.push((average * (maxHeight - minHeight)) / height + minHeight);
    }
  }
  return data;
});
Final product …

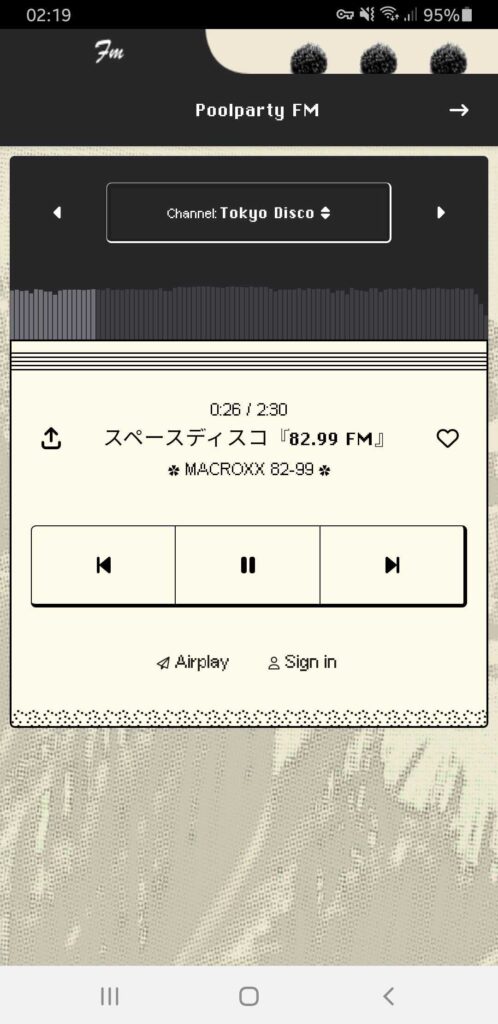
At the conclusion of this tutorial segment, we’ve successfully crafted an engaging Android PoolSuite FM player. Now, we can kick back, relax, and begin enjoying the music (perhaps accompanied by a refreshing glass of Watermelon-Tequila Cocktail 🍸?).
I hope you’ve found this tutorial series enjoyable and informative. Remember, this isn’t the end of the journey. Feel free to fork my PoolParty FM repository and experiment with adding any additional functionalities that pique your interest. The possibilities are endless!

